
Web development has moved at a tremendous pace in the last decade with a lot of frameworks coming in for both backend and frontend development. Websites have become smarter and so have the underlying frameworks used in developing them. All these advancements in web development have led to the development of the browsers themselves too. Most of the browsers are now available with a “headless” version where a user can interact with a website without any UI. You can scrape websites too on these headless browsers using packages like a puppeteer and nodeJS.
Web development heavily relies on testing mechanisms for the quality checks before we push them into the production environment. A complex website will require a complex structure of test suites before we deploy it anywhere. Headless browsers considerably reduce the testing time involved in web development as there is no overhead of any UI. These browsers allow us to crunch more web pages in lesser time.
In this blog, we will learn to scrape websites on these headless browsers using nodeJS and asynchronous programming. Before we start with scraping websites, let us learn more about the headless browsers in a bit more detail. Furthermore, if you are concerned about the legalities of scraping, you can clear your myths about web scraping.
What is a headless browser
A headless browser is simply a browser just without any user interface. A headless browser, like a normal browser, consists of all the capabilities of rendering a website. Since no GUI is available, one needs to use the command-line utility to interact with the browser. Headless browsers are designed for tasks like automation testing.
Headless browsers are more flexible, fast and optimised in performing tasks like web-based automation testing. Since there is no overhead of any UI, headless browsers are suitable for automated stress testing and web scraping as these tasks can be run more quickly. Although vendors like PhantomJS, HtmlUnit have been in the market offering headless browser capabilities for long, browser players like chrome and firefox are also now offering a “headless” version of their browsers. Hence one need not install an extra browser for headless capabilities.
The need for a headless browser
With the advancement in the web development frameworks, browsers have become smarter as well to load all the javascript libraries. With all the evolution in the web development technologies, testing of the websites has been evolved and has emerged out to be one of the essentials of the web development industry. Evolution of headless browsers allow us to perform the following applications.
- Test automation for web applications
End-to-end testing is a methodology used to test whether the flow of an application is performing as designed from start to finish. The purpose of carrying out end-to-end tests is to identify system dependencies and to ensure that the right information is passed between various system components and systems. Headless browsers were designed to cater to this use case as they enable faster web testing using CLI. - Scraping websites
Headless browsers enable faster scraping of the websites as they do not have to deal with the overhead of opening any UI. With headless browsers, one can simply automate the scrapping mechanism and extract data in a much more optimised manner. - Taking web screenshots
Headless browsers may not offer any GUI experience but they do allow users to take snapshots of the websites they are rendering. It certainly helps in cases where one is performing automation testing and want to visualise code effects on the website and store results in the form of screenshots. Taking a large number of screenshots without any actual UI is a cakewalk using headless browsers. - Mapping user journey across the websites
Companies who successfully deliver outstanding customer experiences consistently do better than their competitors. Headless browsers allow us to run programs mapping customer journey test cases to optimise the user experience throughout their decision-making process on the website.
What is Puppeteer
Puppeteer is an API library with the DevTools protocol to control Chrome or Chromium. It is usually headless but can be set to operate Chrome or Chromium in its whole (non-headless). Furthermore, Puppeteer is a library of nodes that we can use to monitor a Chrome instance without heads (UI).
We use Chrome under the hood, but it will be JavaScript programmatically. Puppeteer is the Google Chrome team’s official Chrome headless browser. It may not be most effective as it breaks up a fresh Chrome example when it is initialized. This is the most accurate way to automate Chrome testing, though because it uses the actual navigator.
Web scraping using Puppeteer
In this article, we will be using puppeteer to scrape the product listing from a website. Puppeteer will use the headless chrome browser to open the web page and query back all the results. Before we start actually implementing puppeteer for web scraping, we will look into its setup and installation.
After that, we will implement a simple use case where we will go to an e-commerce website and search for a product and scrape all the results. All the above tasks will be programmatically handled by using puppeteer library. Furthermore, we will use the nodeJS language to accomplish the above-defined task.
Installing puppeteer
Let us begin with the installation. Puppeteer is a node javascript library and hence, we will need node js installed on our machine. Node js comes with npm (node package manager) which will help us to install the puppeteer package.
The following code snippet will help you in the installation of node js
## Updating the system libraries ##sudo apt-get update## Installing node js in the system ##sudo apt-get install nodejs |
You can use the below command to install the puppeteer package
npm install --save puppeteer |
Since we have all the dependencies installed now, we can start implementing our scraping use case using puppeteer. We will be controlling actions on the website using our node JS program powered by the puppeteer package.
Scraping products list using puppeteer
Step1: Visiting the page and searching for a product
In this section, we will initialise a puppeteer object first. This object has access to all the utility functions available in the puppeteer package. In this section, our program visits the website, then it searches for the product search bar on the website. Upon finding the search elements, it types the product name in the search bar and loads the result. We gave the product name to the program using the command line arguments
const puppeteer = require('puppeteer');const browser = await puppeteer.launch();const page = await browser.newPage();var args = process.argv[2]await page.click('button.mobile__nav__row--btn-search')await page.type('input#js-site-search-input', args)await page.keyboard.press('Enter');await page.screenshot({path: 'sample.png'}) |
Step 2: Scraping the list of items
In this section, we are scraping the product listings which we got after searching for our given product. HTML selectors were used for capturing web content. All the scrapped results were collated together to make the dataset. The querySelector function allows us to extract the content from the web page using the HTML selector. The querySelectorAll functions get all the content marked with the particular selector whereas querySelector function just returns the first matching element.
let urls = await page.evaluate(() = {let results = [];let items = document.querySelectorAll('li.product__list--item');items.forEach((item) = { let name = item.querySelector('a.product__list--name').innerText let price = item.querySelector('span.pdpPrice').innerText let discount = item.querySelector('div.listingDiscnt').innerText results.push({ prod_name: name, prod_price: price, prod_discount: discount }); });return results;}) |
Full Code
Here is the full working sample of the implementation. We have wrapped up the entire login in a run function and are logging the scrapped results in the console.
const puppeteer = require('puppeteer');function run () { return new Promise(async (resolve, reject) ={ try { const browser = await puppeteer.launch(); const page = await browser.newPage(); var args = process.argv[2] await page.click('button.mobile__nav__row--btn-search') await page.type('input#js-site-search-input', args) await page.keyboard.press('Enter'); await page.screenshot({path: 'sample.png'}) let urls = await page.evaluate(() = { let results = []; let items = document.querySelectorAll('li.product__list--item'); items.forEach((item) = { let name = item.querySelector('a.product__list--name').innerText let price = item.querySelector('span.pdpPrice').innerText let discount = item.querySelector('div.listingDiscnt').innerText results.push({ prod_name: name, prod_price: price, prod_discount: discount }); }); return results; }) browser.close(); return resolve(urls); } catch (e) { return reject(e); } })}run().then(console.log).catch(console.error); |
Running the script
You can use the below command to run the above puppeteer script with a headless browser. We will use the nodejs to run our code. You just have to mention the keyword node and the filename followed by the product name whose data you need to search on the given website and scrape the results.
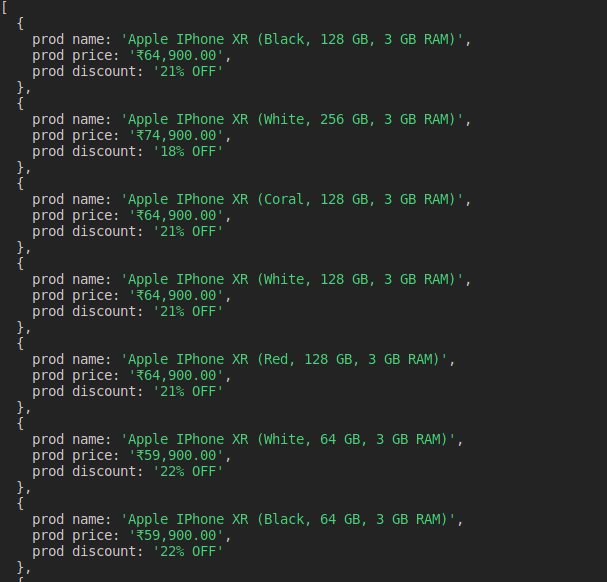
In this example, we are searching for the iPhones on the Croma website and then we are scrapping the product listings.
node headlessScrape.js iphones |
Output
The output of the above code can be visualised like this