

In this blog post I will show how to use a low-code app in MATLAB, the Deep Network Designer, for two different tasks and design paradigms: creating a network from scratch vs. using transfer learning.
The process of building deep learning (DL) solutions follows a standard workflow that starts from the problem definition and continues with the steps of collecting and preparing the data, selecting a suitable neural network architecture for the job, training and fine-tuning the network, and eventually deploying the model (Figure 1).

Figure 1: Basic deep learning workflow.
When it comes to defining the network there are a few important points to keep in mind:
- Selecting the best architecture for the task
- Choosing between designing a new network from scratch or reusing a pretrained network, following the transfer learning paradigm.
The selection of a suitable neural network architecture usually follows the best practices for the application at hand, e.g., the use convolutional neural networks (CNNs or ConvNets) for image classification or recurrent neural networks (RNNs) with long short-term memory (LSTM) cells for text and sequence data types of applications.
Transfer learning is an incredibly easy, quick, and popular method for building DL solutions in some domains, such as image classification using neural network architectures pretrained on ImageNet (a large dataset of more than 1 million images in more than 1,000 categories). Essentially, it consists of using a deep neural network that has been pre-trained in a large dataset of similar nature to the problem you are trying to solve. This is usually accomplished by retraining some of its layers (while freezing the others).
Beware that the predictable nature of the methodology used to create DL applications hides many of its complexities. In addition to choosing the best network architecture for the job and deciding whether to build it from scratch or adopt a transfer learning approach, a recipe for success in deep learning requires several ingredients that are not explicit in Figure 1, such as the availability of large and representative data for training and easy access to compute.
The importance of using good tools
The popularization and widespread adoption of deep learning to solve a wide variety of problems in virtually every area of human activity is greatly due to the availability of tools, libraries, and frameworks of different level of complexity.
In a not-too-distant past, developing neural networks and other sophisticated algorithms for solving complex problems required writing C code and mastering the inner workings of CUDA to leverage the computational power of NVIDIA GPUs. During the past decade, the panorama has changed dramatically, making it progressively easier to enter the field and create competitive solutions while abstracting lower-level details.
Currently there are several popular deep learning frameworks out there, such as TensorFlow, Keras, and PyTorch as well as in MATLAB. They provide a convenient way to write minimal code and produce tangible results quickly, accelerating the development of DL solutions.
Moving up and away from technical complexities even further, today we can even create simple DL solutions using interactive, low-code /low-code tools, such as Googles Teachable Machine or MATLABs Deep Network Designer.
When building a DL solution, you must decide which level of sophistication matches your background, your goals, the problem constraints, and the requirements and metrics for success. Regardless of the specifics of the problem at hand one thing is clear: good tools and apps can help, by allowing users to abstract away from code and focus on the problem at hand!
Building low-code deep learning solutions using the Deep Network Designer app
With the MATLAB Deep Network Designer app you can tackle the entire DL workflow, from preparing the data to deploying a working solution.
This is a friendly and intuitive app that allows you to import networks or build a network from scratch, view and edit layer properties, combine networks, and generate code to create the network architecture (Figure 2). It also features easy-to-use functionality to import and inspect your data, configure training options, train your network, and export the resulting model. The resulting workflow is highly interactive and some of its dynamics can be best appreciated through demo videos such as this.
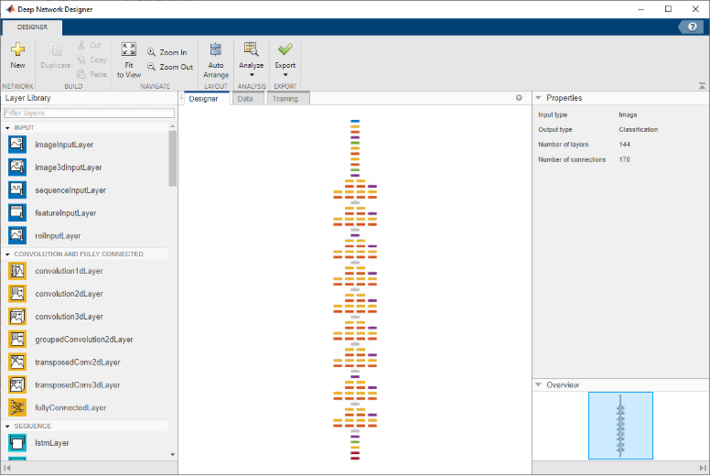
Figure 2: The Deep Network Designer app.
An example
Here is an example of how to use MATLAB Deep Network Designer for two tasks:
- Diabetes prediction: where we start from tabular data containing numerical indicators of patients health and design a deep learning solution from scratch.
- Medical image classification: where we start from labeled images from six different categories and use transfer learning to build a multiclass classifier.
Both tasks are approached by following similar steps, as described next.
Task A: Diabetes prediction Designing a model from scratch
Step 1: Define the type of problem were trying to solve.
- We want to predict whether a patient might develop diabetes or not, given some health indicators. This is essentially a binary classification task.
Step 2: Understand the data that will be used for training and testing.
- We have tabular data from 537 patients belonging to a specific demographic. There are eight numerical attributes (e.g., age, BMI, insulin levels, etc.) per patient that can be used as predictors.
Step 3: Select an appropriate architecture for this type of problem.
- Since this is a traditional prediction task using numerical data in tabular form, we use a fully connected feedforward neural network and choose to design it from scratch.
Step 4: Build your model using the Deep Network Designer app.
- Since we chose to design our neural network from scratch, we start from a blank canvas, drag one layer at a time from the left-hand panel onto the work area in the Design tab, configure the parameters of each layer, and connect the layers as desired. Figure 3 shows the resulting network.
Step 5: Import data for training.
- We follow the best practices for handling data tables in MATLAB.
Step 6: Train your network.
- After selecting appropriate training options (learning rate, optimizer, mini-batch size, etc.) for each case, we train each network.
Step 7: Export the resulting model.
- Once training is complete, we can export the model to the MATLAB workspace as well as generate code to perform the same steps again programmatically in the future.
Step 8: Test your solution with new data.
- We use the resulting models to make predictions on data that was not used for training each network.
Step 9: Assess the performance of your model.
- We compute the overall accuracy of each model and compare against the baseline.
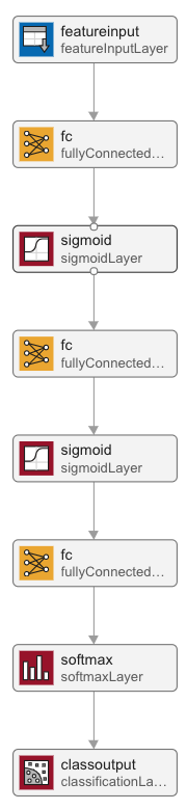
Figure 3: Neural network architecture for Task A: diabetes prediction from tabular data.
Task B: Medical image classification Transfer learning
Step 1: Define the type of problem were trying to solve.
- We want to classify a medical image into one out of six modalities (hand x-ray, abdomen CT, chest x-ray, chest CT, breast MRI, or head CT). This is a multiclass image classification task.
Step 2: Understand the data that will be used for training and testing.
- We have approximately 60,000 grayscale images (roughly 10,000 images per category) of the same size (64-by-64 pixels) organized into six folders whose names match the associated categories.
Step 3: Select an appropriate architecture for this type of problem.
- Since this is an image classification task, we use a pretrained CNN under the transfer learning paradigm.
Step 4: Build your model using the Deep Network Designer app.
- We start from a pretrained SqueezeNet model, which can be selected directly in Deep Network Designers start page (Figure 4) and follow the proper steps to reuse it, in transfer learning fashion, for the problem at hand. Figure 5 shows a small portion of the resulting architecture, with emphasis on the two layers that need to be modified for the new problem and data set. The remaining 66 layers remain unchanged.
Step 5: Import data for training.
- We use augmentedImageDatastore to elegantly handle image data augmentation (for training) as well as color processing and resizing tasks (for both training and validation data sets) and take advantage of the functionality under the Data tab to import and inspect the data (Figures 6 and 7).
Steps 6 through 9 are similar to the ones for Task A.
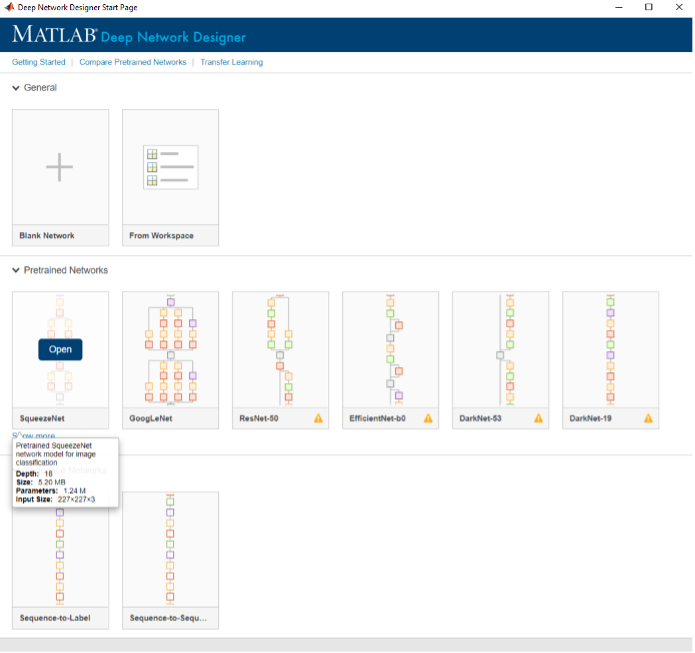
Figure 4: Importing a pretrained model, SqueezeNet, directly into Deep Network Designer.
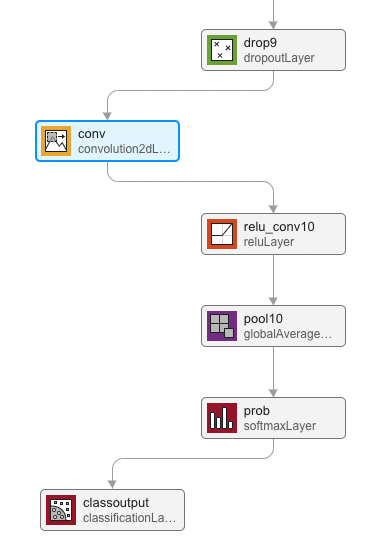
Figure 5: Transfer learning using SqueezeNet for Task B (partial view of the model): only two layers (out of 68) need to be modified for the new problem and data set.
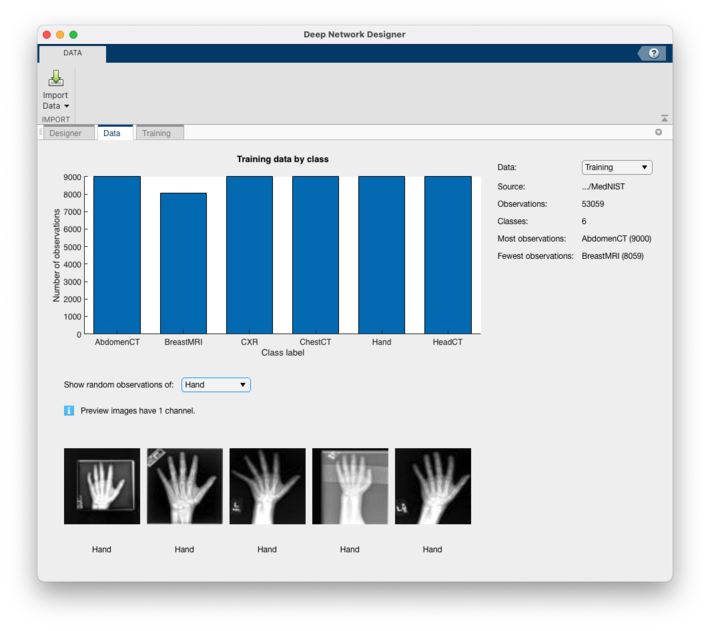 Figure 6: Histogram showing class distribution and examples of images from the training data set.
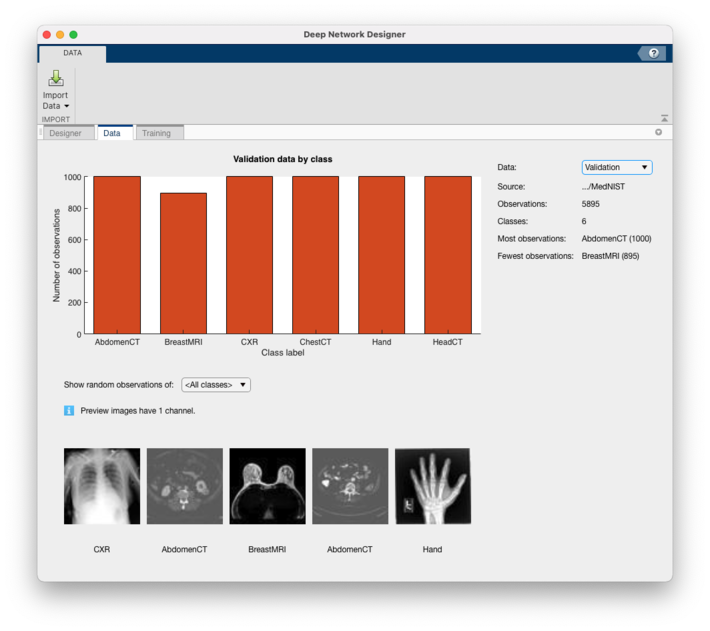 Figure 7: Histogram showing class distribution and examples of images from the validation data set.
Key takeaways
Deep Learning practitioners should use the best tools for every aspect of their jobs.
In this blog post, we have shown how to use the low-code Deep Network Designer app for two different tasks and design paradigms: creating a network from scratch vs. using transfer learning without the need to write any code.
However, this could be just the first stage for finding the right model. Some deep learning solutions require a substantial amount of fine-tuning and experimentation. There are excellent low code tools and recommended best practices for managing and tracking those experiments, as discussed in a previous blog post on Experiment Management.
The best way to learn more about the Deep Network Designer app is to practice! You might want to check out the companion examples and use them as a starting point for your own explorations. Good luck on your journey!