
Modern IT companies widely use virtualization due to advantages such as scalability, rational consumption of resources, and convenient backup. This article explains how Policy-Based Data Protection, a feature in NAKIVO Backup & Replication software, works, makes managing VM data protection more accessible, and outlines its benefits.
What Is Policy-Based Data Protection?
Policy-Based Data Protection is a feature that allows you to protect VMs matching policy rules. For protecting VMs by making backups, replicas, backup copies, etc., you need to create a job when using VMware backup from NAKIVO. You can add items matching the particular criteria to a job by using this feature – for example, consider adding VMs that contain “Linux” in their names that are in a powered-on state and are located in the specified storage area.
When Can It Be Used?
Companies can use Policy-Based Data Protection for dynamically changing virtual environments where VMs frequently migrate from one host to another or migrate between data stores. Here, you can delete some VMs and deploy new VMs instead of the deleted VMs, and VMs can change the networks to which they are connected. This feature is especially helpful in large environments with many VMs that need to be protected, where managing VMs manually takes a long time.
The Working Principle
Once a policy is created, all VMs that match the rules set by the policy are added to a job automatically. When some parameter is changed, you can exclude a VM added to the job and include the new matching VM not added to the job. Imagine that you have a policy with the rule for which the VMs with names starting with “Linux” must be added to a job. If a VM named LinuxUbuntu16 is renamed to Ubuntu16, the VM will be excluded from the current job. Inversely, if a VM named OpenSUSE is renamed to LinuxSUSE, such a VM would automatically be added to the job.
Similarly, if you have a policy-based job with a rule according to which the VMs located on the datasore1 must be added to a job, then VMs located on other data stores will not be added to the job. If a VM located on the datastore1 is migrated to another datastore, then such VM will be excluded from the current job. Inversely, the VMs migrated to the datastore1 will be added to the job automatically.
You can also add multiple rules to a policy-based job. The maximum number of policy rules per job is 50. The limit of max source objects (such as VMs) is 500 for each job. If this number is exceeded, then a warning message is displayed: “The maximum number of job objects has been reached.”
There are two logical (AND / OR) conditions that you can use when you add multiple rules to a policy-based job.
If you need all rules to be matched, select the AND condition. This includes items to a job if all rules are matched.
If you require matching of a particular rule, select the OR condition. This includes items if any one rule is matched.
For example, you can create a policy with two rules to add VMs that contain names that start with “Linux” AND are located on the datastore1. Another case is developing a policy with two rules to add VMs that contain names that start with Linux OR which names start with FreeBSD for creating a job that would be used for Linux and FreeBSD virtual machines (the VMs must be named accordingly).
The inventory must be refreshed before changes in your virtual environment can be noticed by the product. The default auto-refresh interval is 60 minutes. The minimal available inventory refresh interval is 5 minutes.

A new policy view is available on the first step of a new job wizard and on the first step of editing job options. You can enable the policy view in the dropdown menu, where you can also select Hosts & Clusters or VMs & Templates view modes. Switching to a different view will reset your current selection. When you select the policy view, you can select a condition, a rule, a search option, and search criteria. Let’s explore search options and search criteria deeper.
Search Options
Nine search options are available for VMware jobs, eight for Hyper-V jobs, and eight for Amazon EC2 jobs (see the table below). Each search option includes some criteria consisting of at least three characters. Select a search option from the “Search by” dropdown menu.

Let’s review the policy job search options on an example of VMware jobs.
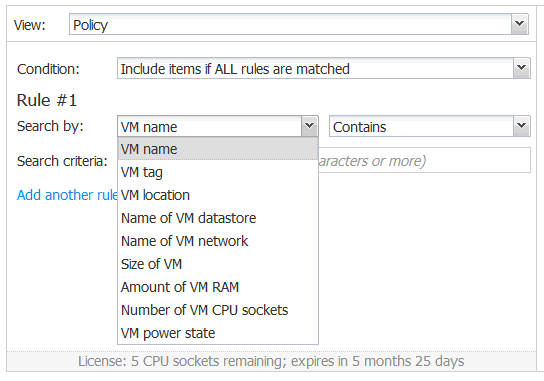
VM Name
The VM name search option is the first option on the list. Six parameters are available for this option.
Contains (is selected by default). The names of VMs contain the characters defined as the search criteria. For example, if you type ubuntu16 in the search criteria field, the VMs like these would be added to the job: full_ubuntu16, Ubuntu16.04, Xubuntu16, Xubuntu16-master. Search criteria for “Contains” and “Doesn’t contain” options are not case-sensitive.

Doesn’t contain. Adds the VMs whose names do not contain the string defined as the search criteria. For example, you may need to add source VMs, but not VM replicas to a job. Enter replica in the text field of the “Doesn’t contain” search criteria (If you use NAKIVO Backup & Replication, the -replica string is appended to the names of VM replicas by default).
Equals. You must enter the exact Name of the VM that will be added to a job. The search criteria for this option are case-sensitive. If there is a VM named Xubuntu16 in your inventory, entering Xubuntu or Xubuntu16 in the search criteria field won’t add the Xubuntu16 VM to the job. You must manually enter Xubuntu16 in this case because all characters must match.

Doesn’t equal. The exact Name of the VM must be entered manually as the search criteria if you would like to prevent adding a particular VM to the job. For example, to avoid adding a VM named Win7-replica, you should enter Win7-replica in the search criteria text field. Entering -replica or win7-replica will not work in this case.
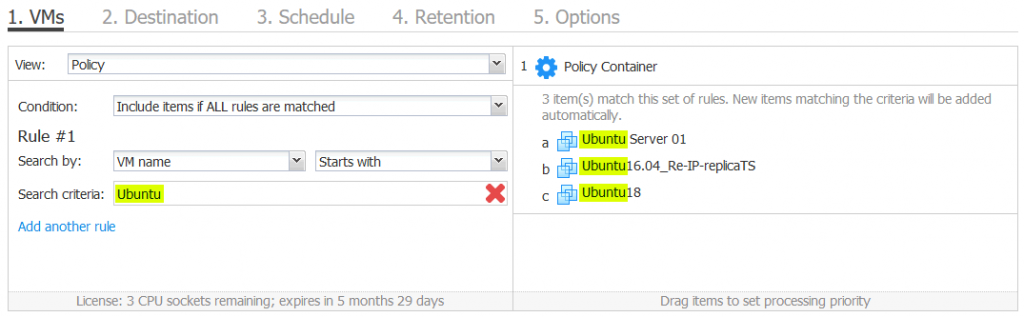
Starts with. This option is useful when you add VMs whose names start with the string defined as the search criteria. For example, if you enter Ubuntu in the search criteria text field, the VMs named Ubuntu Server 01, Ubuntu16.04, and Ubuntu18 will be added to a job. The VMs named full_ubuntu16 and Xubuntu16 will not be added to the job in this case. Search criteria for “Starts with” and “Ends with” options are case-sensitive.
Ends with. Adds the VMs whose names end with the string defined as search criteria. For example, if you want to add VMs with Linux operating systems of the Ubuntu 16 family (Ubuntu, Kubuntu, Xubuntu), you may enter u16 in the text field of the search criteria. As a result, VMs named a_ubu16, full_ubuntu16, and Xubuntu16 will be added to the job.

VM Tag
Tags allow you to attach metadata to VMs and other objects of your virtual infrastructure, such as ESXi hosts, data centers, clusters, etc., and sort tags by categories. More than one tag can be assigned to a VM. Using tags helps select VMs located on specific ESXi hosts with a common purpose. You may assign VM tags to VMs without signs of their purpose in the VM names. Below you can see an example of creating tags for virtual machines:
- Dev, Test, Prod – tags for VMs categorized by operation type.
- Linux, Windows, FreeBSD, Solaris – tags for VMs categorized by the operating system type.
- Backed up VMs, Replicated VMs, non-protected VMs – tags for VMs categorized by their protection level.
The VM tag option allows you to add VMs with the appropriate VM tag to the policy-based job. Let’s imagine that users of some departments assign the “backed up VMs” tag to VMs that must be backed up. The tag is assigned to a VM when users create VMs or when VMs’ importance status is changed. The system administrator may not know whether a new VM of that department must be backed up, but he or she can create a policy-based backup job with NAKIVO Backup & Replication to automatically gather all VMs from that department (a datacenter in vSphere can use the Name of the department) that have the “backed up VMs” tag to a single backup job.

Search criteria for the “VM tag” option are not case-sensitive. The VM tag is not available for Hyper-V.
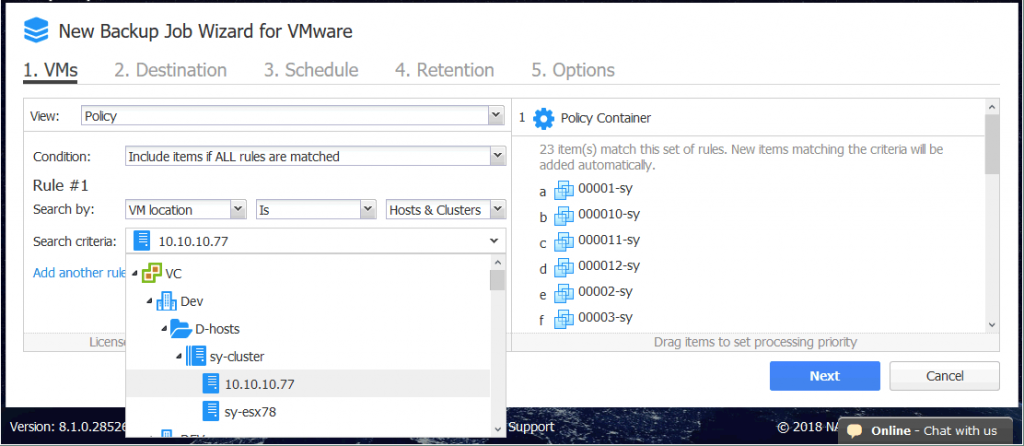
VM Location
Search by VM location allows you to add VMs located in the same data center, VM folder, host, or cluster to a job. VM location must be selected from the drop-down menu where VMware, Hyper-V, or EC2 objects are displayed.
The logic of this rule has two options and is the following:
- If the VM location is the defined parameter, VMs that meet the condition are added to the job.
- If the VM location is not the defined parameter, then VMs not located in the specified object are added to the job.
For VMware jobs, you can switch between Host & Clusters and VMs & Templates modes if you use the policy view when configuring a job. A rule that uses the VM location policy option can be helpful with other rules.
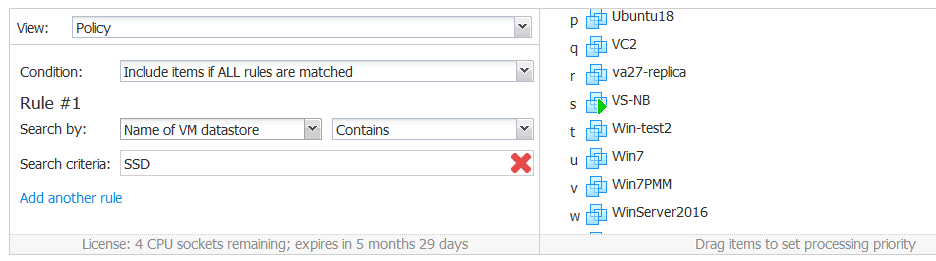
Name of VM Datastore
This option allows you to select VMs that are located or not located on the data stores specified by the policy.
These are the following search parameters for searching VMs by the Name of VM datastore:
- Contains
- Doesn’t contain
- Equals
- Doesn’t equal
- Starts with
- Ends with
The logic of using these parameters is similar to the logic of using said parameters for the VM name option. The difference is that the search criteria are used for specifying the datastore Name instead of VM name. VMs located on multiple data stores can be selected by using the Name of datastore policy option. This option is not available for Amazon EC2 jobs.
Example. Imagine that you have three ESXi hosts – ESXi1, ESXi2 and ESXi3. Each host has two data stores that are named according to the host names and disk types. The datastores’ names are ESXi1-HDD, ESXi1-SSD, ESXi2-HDD, ESXi2-SSD, ESXi3-HDD, ESXi3-SSD. You have a free hour for lunch and should schedule a backup of VMs located on SSD datastores for all hosts between 1:00 and 2:00 PM. Backing up VMs located on HDD-based data stores requires more time (due to the larger amount of data stored on HDD-based datastores) and, for this reason, you want to backup that VMs at night during non-working hours. You should create two policy-based backup jobs.
Job1. Rule1. Search by the Name of VM datastores that contains the SSD string in the text field of the search criteria. Schedule starting the job at 1:00 PM and ending at 2:00 PM for working days.
Job2. Rule1. Search by the Name of VM datastores containing the HDD string in the search criteria text field. Schedule starting the job at 8:00 PM for working days.
Name of VM Network
With this policy option, you can select all VMs connected to virtual networks specified by the policy.
Search parameters are the same as the search parameters of the Name of VM datastore policy option:
- Contains
- Doesn’t contain
- Equals
- Doesn’t equal
- Starts with
- Ends with
Logics of using these search parameters are also similar. Let’s explain an example of when this policy option can be used.
Example. A VM can have multiple virtual network adapters, each of which can be connected to a different network. A VM can be connected to the internal and external networks, to the test or production network. Imagine that you want to back up VMs connected to the production network named VM Network 2 (the VMs are running on different ESXi hosts). To make this, you need to create a policy-based backup job and add a rule that can search by the Name of the VM network that equals VM Network 2.

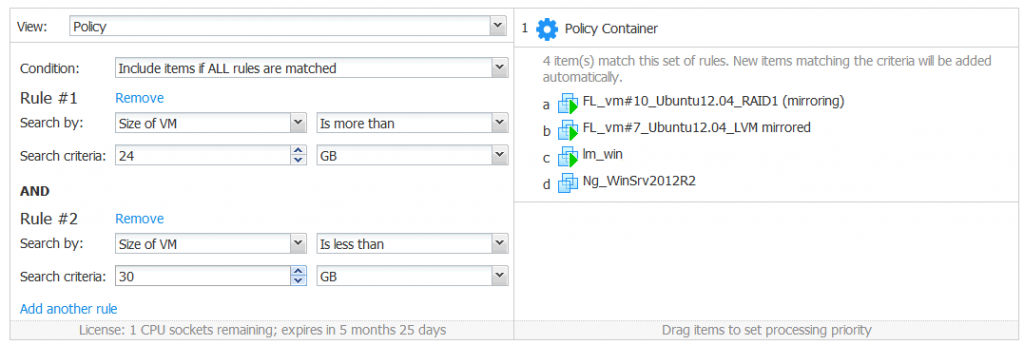
Size of VM
This policy option allows you to search VMs by the size of a particular VM if the size of the VM:
- Is more than [search criteria] [units]
- Is less than [search criteria] [units]
- Equals [search criteria] [units]
- Does not equal [search criteria] [units]
The search criteria must be only digital (at least one digit). Units can be Megabytes (MB), Gigabytes (GB), and Terabytes (TB) and can be selected from the dropdown menu.
The size of the VM policy option can be helpful for replication. You should replicate small VMs to the small data stores on ESXi servers and large VMs to large data stores. For example, you should replicate VMs whose size is less than 4 GB to the datastore1, whose size is 1 TB, while the VMs whose size is more than 4 GB would be replicated to the 10TB datastore2. You may also need to select VMs that, for example, consume more than 24 GB and less than 30 GB of disk space.
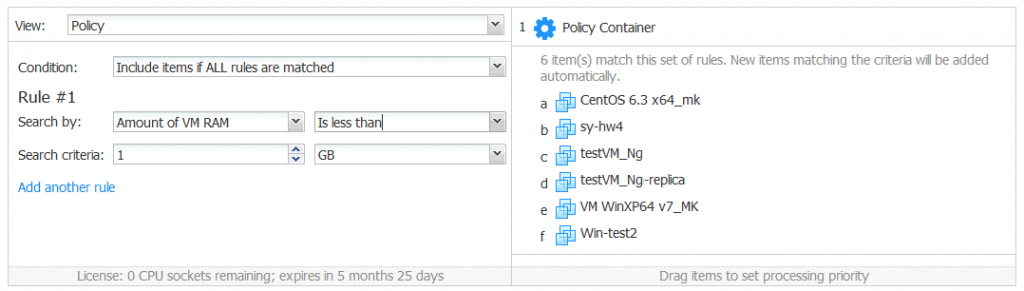
Amount of VM RAM
This policy option allows you to add the VMs with the appropriate amount of VM memory to a job. VMs are added to the job if the amount of VM RAM:
- Is more than [search criteria] [units]
- Is less than [search criteria] [units]
- Equals [search criteria] [units]
- Does not equal [search criteria] [units]
You must enter at least one digit in the search criteria field. Units can be MB or GB and can be selected from the dropdown menu.
The amount of VM RAM policy option can be helpful for replication jobs. For example, you have limited RAM on an ESXi host deployed on a disaster recovery site. This host doesn’t have enough memory to run memory-hungry VM replicas after a failover. You can create a policy-based replication job and replicate VMs whose VM RAM is less than 4 GB to that ESXi host. VMs that consume more RAM can be replicated to another powerful ESXi host with another policy-based replication job.
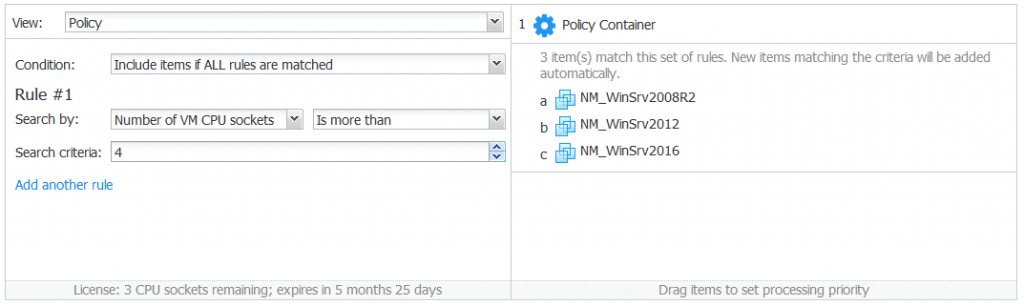
Number of VM CPU Sockets
This policy option allows you to add the VMs with the appropriate number of CPU sockets to a job. VMs are added to the job if the number of VM CPU sockets:
- Is more than [search criteria]
- Is less than [search criteria]
- Equals [search criteria]
- Does not equal [search criteria]
The search criteria is the number that must consist of at least one digit.
The Number of VM CPU sockets policy option can be helpful in replication jobs, similar to the Amount of VM RAM policy option.
VM Power State
By using this policy option, you can add VMs to a job depending on their power state that is (or is not):
- Powered On (Running)
- Powered Off (Off/Stopped)
- Suspended (Saved)
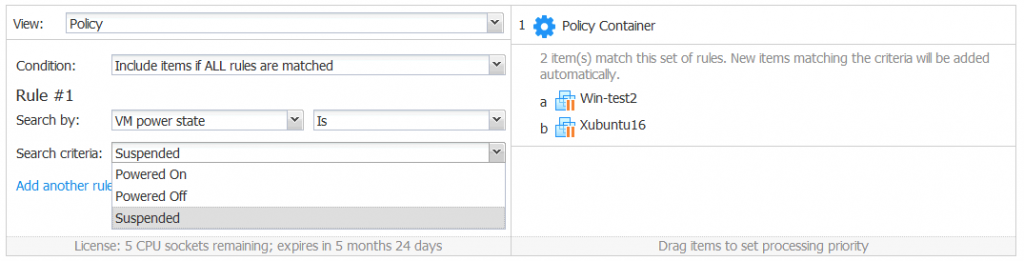
Let’s see the use cases.
Example 1. Imagine that you want to back up VMs with the enabled VMware Changed Block Tracking feature. VMware Changed Block Tracking can be used only for backing up (replicating) the VMs that are in the Powered On state. In this case, you can create a policy-based job to automatically add the powered-on VMs to the job.
Example 2. You need to back up VMs with some applications that are not supported by application-aware VM backup. Hence, VMs with such applications should be powered off to ensure data and application consistency. In this case, you can create a policy-based VM backup job and configure the automatical adding the powered-off VMs to that job.
Configuration Examples with Multiple Rules
You can create different combinations of rules in policy-based jobs. Let’s see some examples of policies with multiple rules for VMware VMs.
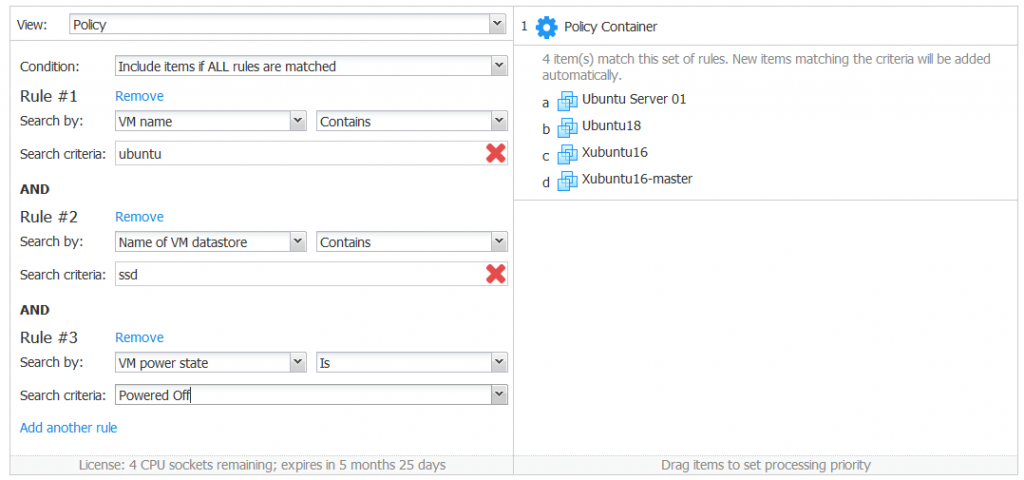
Example 1. You need to back up Ubuntu-like Linux VMs that are stored on SSD datastores and are powered off. You know that the names of your VMs contain the Name of the OS and that the names of your data stores contain the disk type. Create a policy-based VMware backup job, select the Include items if ALL rules are matched condition, and add three rules.
Rule 1. Search by: VM name contains Ubuntu.
Rule 2. Search by: Name of VM datastore contains ssd.
Rule 3. Search by: VM power state is Powered Off.
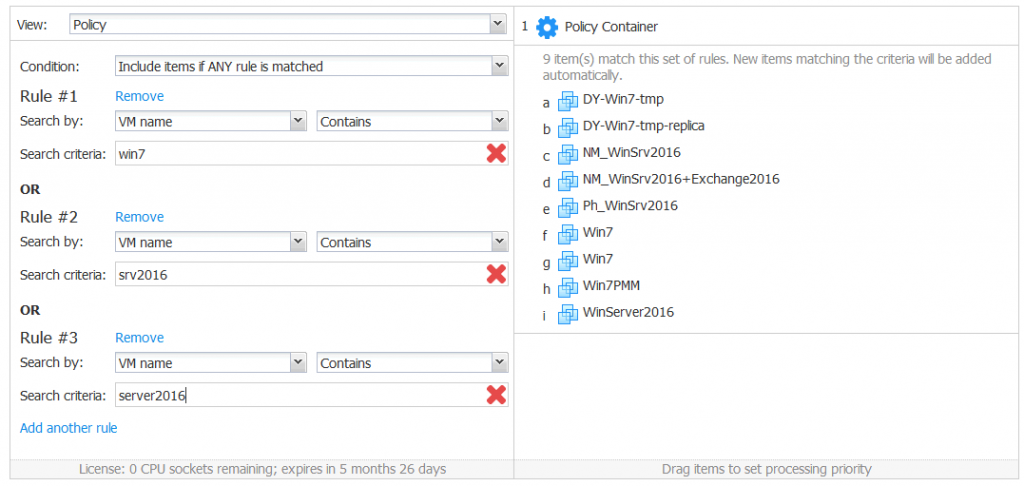
Example 2. You need to back up all VMs with Windows 7 and Windows Server 2016 operating systems installed. You know that the names of your VMs contain a part of the OS name. Create a policy-based VMware backup job, select the Include items if ANY rule is matched condition, and add rules as follows.
Rule 1. Search by: VM name contains win7.
Rule 2. Search by: VM name contains srv2016.
Rule 3. Search by: VM name contains server2016.
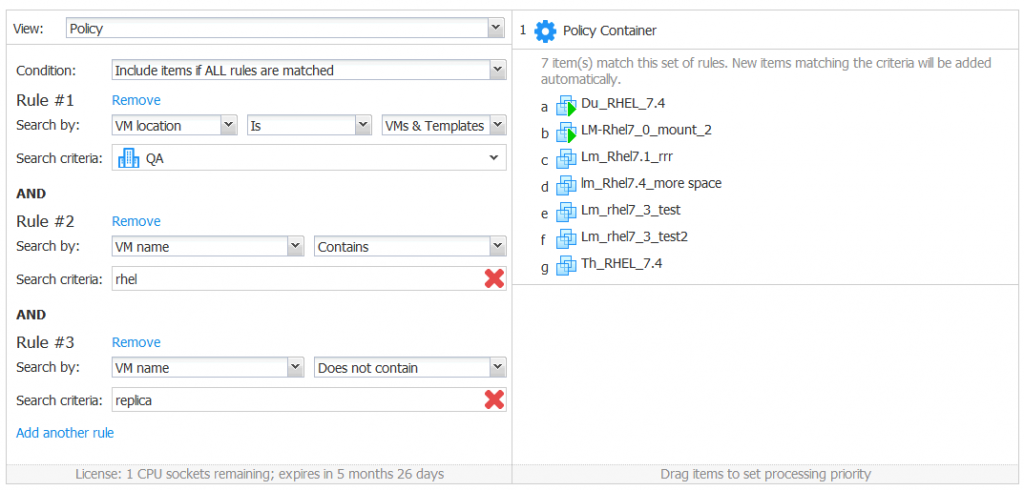
Example 3. You need to back up VMs from the QA data center with Red Hat Enterprise Linux installed (you know that VMs contain RHEL in their names). Create a policy-based VMware backup job, select the Include items if ALL rules are matched condition, and add rules as follows.
Rule 1. Search by: VM location is [VM & Templates] QA.
Rule 2. Search by: VM name contains rhel.
Rule 3. Search by: VM name does not contain replica.
Advantages of Using Policies
As you can see, policy-based data protection provides more possibilities for configuring jobs in NAKIVO Backup & Replication. The main advantages of using policy-based jobs are:
- Time-saving. Manual VM management is time-consuming for large virtual infrastructures. Manual searching of the VMs for adding them to a job requires significant human attention and time. Policies allow you to simplify configuring VM protection jobs. You can save time when you need to add multiple objects that have different locations but have some common criteria, such as a VM name, datastore Name, hostname, power state, size of VM, etc.
- Automation. Some items may go unnoticed and, as a result, can be missed when they are added manually. You can avoid adding VMs to a job manually since, with policies, you can set conditions and search criteria for adding the matching items to the job automatically.
- Flexibility. You can use different approaches that are suitable for an environment that is dynamically changing for adding items to a job. When new VMs are frequently added, you don’t need to manually update the existing job; just wait for inventory updates, and matching items will be added automatically.
Conclusion
Policy-Based Data Protection is a valuable feature that is now available in NAKIVO Backup & Replication 8.1 and can be used for VMware, Hyper-V, and Amazon EC2 data protection jobs. This feature is handy for large, dynamically changing environments, providing greater simplicity, flexibility, time-saving, and automation. The policy view can be selected on the first step of configuring a job. In combination with other great features provided by NAKIVO Backup & Replication, you get a powerful all-in-one data protection solution for your virtualized or cloud environment.