
Introduction
When you heard “Search by Image”, did you first think of the reverse image search function by search engines such as Baidu and Google? In fact, you can build your own image search system: build your own picture library; select a picture to search in the library yourself, and get several pictures similar to it.
As a similarity search engine for massive feature vectors, Milvus aims to help analyze increasingly large unstructured data and discover the great value behind it. In order to allow Milvus to be applied to the scene of similar image retrieval, we designed a reverse image search system based on Milvus and image feature extraction model VGG.
This article is divided into the following parts:
- Data preparation: introduces the data support of the system.
- System overview: presents the overall system architecture.
- VGG model: introduces the structure, features, block structure and weight parameters.
- API introduction: describes the five fundamental working principles of the system API.
- Image construction: explains how to build client and server docker images from source code.
- System deployment: shows how to set up the system in three steps.
- Interface display: display the system GUI.
1 Data preparation
This article uses the PASCAL VOC image data set as an example to build an end-to-end solution for reverse image search. The data set contains 17,125 images, covering 20 directories: Person; Animal (bird, cat, cow, dog, horse, sheep); Vehicle (airplane, bicycle, boat, bus, car, motorcycle, train); Indoor (bottle, chair, dining table, pot plant, sofa, TV). The data set size is approximately 2GB. You can download the training/validation data through this link: http://host.robots.ox.ac.uk/pascal/VOC/voc2012/VOCtrainval_11-May-2…
Note: You can also use other image data set. The currently supported image formats are .jpg format and .png format.
2 System Overview
In order to allow users to interact on web pages, we have adopted a C / S architecture. The webclient is responsible for receiving the user’s request and sending it to the webserver. The webserver, after receiving the HTTP request from the webclient, performs the operation and returns the results to the webclient.
The webserver is mainly composed of two parts, the image feature extraction model VGG and the vector search engine Milvus. The VGG model converts images into vectors, and Milvus is responsible for storing vectors and performing similar vector retrieval. The architecture of the webserver is shown below:
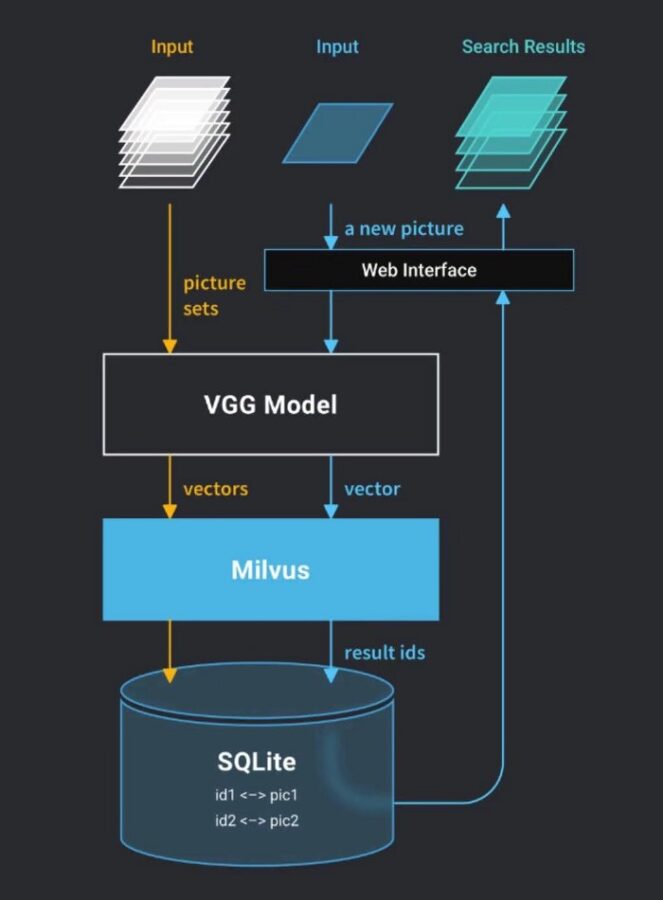
Webserver architecture
3 VGG Model
VGGNet was proposed by researchers from the University of Oxford’s Visual Geometry Group and Google DeepMind. It is the winner in the localization task and the 1st runner-up in the classification task in ILSVRC-2014. Its outstanding contribution is to prove that using a small convolution (3 \ * 3) and increasing the network depth can effectively improve the model’s performance. VGGNet is highly scalable and its generalization ability to migrate to other data sets is very good. The VGG model outperforms GoogleNet on multiple transfer learning tasks, and it is the preferred algorithm for using CNN to extract features from images. Therefore, VGG is selected as the deep learning model in this solution.
VGGNet explored the relationship between the depth of CNN and its performance. By repeatedly stacking 3 \ * 3 small convolution kernels and 2 \ * 2 maximum pooling layers, VGGNet successfully constructed CNNs with a depth of 16–19 layers. The VGG16 model provided by Keras’s application module (keras.applications) is used in this solution.
(1) VGG16 structure
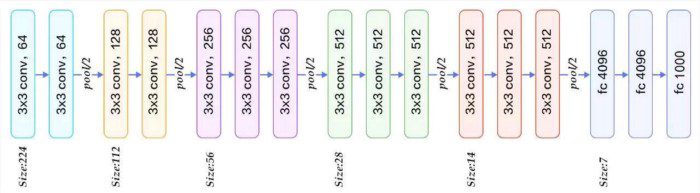
VGG16 contains 13 Convolutional Layers, 3 Fully Connected Layers, and 5 Pooling Layers. Among them, the convolutional layer and the fully connected layer have weight coefficients, so they are also called weighting layers. The total number of weighting layers is 13 + 3 = 16, which explains why the structure is called VGG16. (The pooling layer does not involve weights, so it does not belong to the weighting layer and is not counted).
(2) VGG16 Features
- The convolutional layers all use the same convolution kernel parameters.
- All pooling layers use the same pooling kernel parameters.
- The model is constructed by stacking several convolutional layers and pooling layers, which is relatively easy to form a deeper network structure.
(3) VGG16 block structure
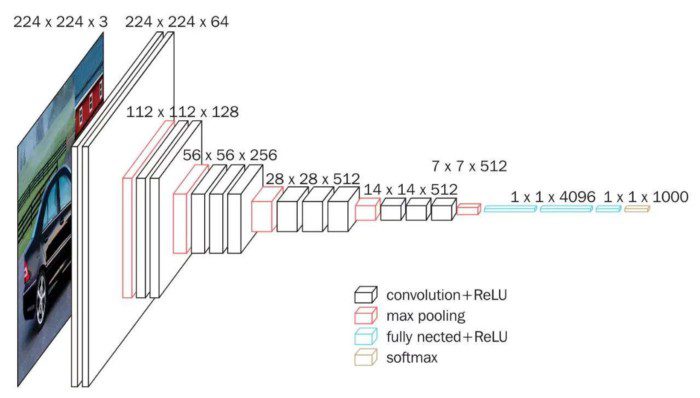
The convolution layers and pooling layers of VGG16 can be divided into different blocks, which are numbered Block1 ~ Block5 in order from front to back. Each block contains several convolutional layers and a pooling layer. For example: Block2 contains 2 convolutional layers (conv3–256) and 1 pooling layer (maxpool). And in the same block, the number of channels of the convolutional layer is the same. According to the VGG16 structure diagram given below, the input image of VGG16 is 224x224x3. During the process, the number of channels doubles, from 64 to 128 progressively, and then to 256, until finally to 512 which no longer changes. The height and width of the image halve from 224 → 112 → 56 → 28 → 14 → 7.
(4) Weight parameter
VGG has a simple structure, but it contains a large number of weights, reaching 139,357,544 parameters. These parameters include convolution kernel weights and fully connected layer weights. Therefore, it has a high fitting ability.
4 API Introduction
The webserver of the entire system provides five APIs that correspond to train, process, count, search, and delete operations. Users can perform image loading, load progress query, Milvus vector number query, image retrieval, and Milvus table deletion. These five APIs cover all the basic functions of the reverse image search system. The rest of the article will explain in detail each of these functions.
(1) Train
The parameters of the train API are shown in the following table:
MethodsNameTypePOSTFileString
Before performing similar image retrieval, you need to load the image library into Milvus, and then call the train API to pass the path of the image to the system. Because Milvus only supports the retrieval of vector data, it is necessary to convert the images to feature vectors. The conversion process is mainly achieved by using Python to call the VGG model:
from preprocessor.vggnet import VGGNet
norm_feat = model.vgg_extract_feat (img_path)
After obtaining the feature vectors of the images, import these vectors into Milvus using Milvus’s insert_vectors interface:
from indexer.index import milvus_client, insert_vectors
status, ids = insert_vectors (index_client, table_name, vectors)
After importing these feature vectors into Milvus, Milvus will assign a unique id to each vector. In order to better find the image based on the vector id during subsequent retrieval, you need to save the relationship between the vector ids and the corresponding images:
from diskcache import Cache
for i in range (len (names)):
 cache [ids [i]] = names [i]
(2) Process
The method of the process API are GET, and no other parameters need to be passed in the call. The process API can be called to view the progress of image loading, for example the number of converted images that have been loaded and the total number of images in the incoming path.
(3) Count
The count API’s method is POST, and no other parameters need to be passed in the call. The count API can be called to view the total number of vectors in the current Milvus. Each vector is converted from an image.
(4) Search
The parameters of the search API are shown in the following table:
MethodsNumFilePOSTTopk (int)Image File
Before importing the image you want to query into the system, call the VGG model to convert the images to vectors first:
from preprocessor.vggnet import VGGNet
norm_feat = model.vgg_extract_feat (img_path)
After obtaining the query vectors, call Milvus’s search_vectors interface for similar vector search:
from milvus import Milvus, IndexType, MetricType, Status
status, results = client.search_vectors (table_name = table_name, query_records = vectors, top_k = top_k, nprobe = 16)
After getting the result vector id, the corresponding image name can be retrieved according to the correspondence between the previously stored vector ids and the image names:
from diskcache import Cache
def query_name_from_ids (vids):
 res = []
 cache = Cache (default_cache_dir)
 for i in vids:
 if i in cache:
 res.append (cache [i])
 return res
(5) Delete
The delete API’s method is POST, and no additional parameters need to be passed in the call. The delete API can be used to delete the tables in Milvus and clean up the previously imported vector data.
5 Docker image build
(1) Build pic-search-webserver image
First pull the Milvus bootcamp code, then use the Dockerfile we provided to build the image of the webserver:
$ git clone https://github.com/milvus-io/bootcamp.git
$ cd bootcamp / solutions / pic_search / webserver
 # Build image
 $ docker build -t pic-search-webserver.
 # View the generated image
 $ docker images | grep pic-search-webserver
Of course, you can also directly use the image we uploaded to dockerhub:
$ docker pull milvusbootcamp / pic-search-webserver: 0.1.0
(2) Build pic-search-webclient image
First pull the Milvus bootcamp code, then use the Dockerfile we provided to build the image of webclient:
$ git clone https://github.com/milvus-io/bootcamp.git
$ cd bootcamp / solutions / pic_search / webclient
 # Build image
 $ docker build -t pic-search-webclient.
 # View the generated image
 $ docker images | grep pic-search-webclient
Of course, you can also directly use the image we uploaded to dockerhub:
$ docker pull milvusbootcamp / pic-search-webclient: 0.1.0
6 System deployment
We provide GPU deployment schemes and CPU deployment schemes, and users can choose for themselves. The detailed deployment process is available through this link: https://github.com/milvus-io/bootcamp/tree/0.9.0/EN_solutions/pic_s…
Step 1 Start Milvus Docker
For detailed steps, please refer to the link: https://milvus.io/docs/guides/get_started/install_milvus/install_mi…
Step 2 Start pic-search-webserver docker
$ docker run -d --name zilliz_search_images_demo \
-v IMAGE_PATH1: / tmp / pic1 \
 -v IMAGE_PATH2: / tmp / pic2 \
 -p 35000: 5000 \
 -e "DATA_PATH = / tmp / images-data" \
 -e "MILVUS_HOST = 192.168.1.123" \
 milvusbootcamp / pic-search-webserver: 0.1.0
Step 3 Start pic-search-webclient docker
$ docker run --name zilliz_search_images_demo_web \
-d --rm -p 8001: 80 \
 -e API_URL = http: //192.168.1.123: 35000 \
 milvusbootcamp / pic-search-webclient: 0.1.0
7. Interface Display
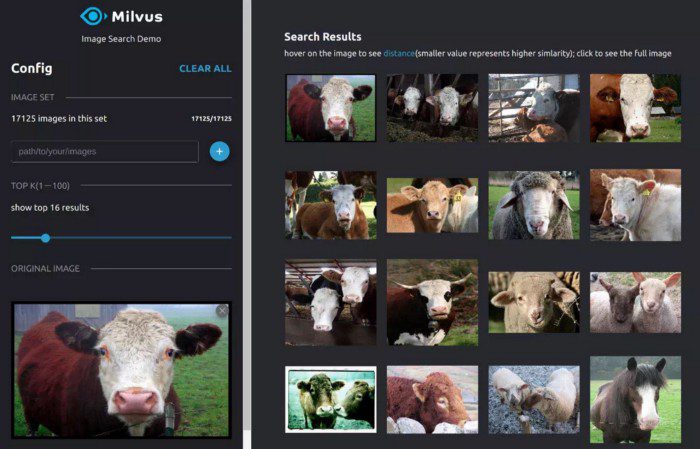
When the above deployment procedures are completed, enter “localhost: 8001” in the browser to access the reverse image search interface.

Fill in the path of the images, and wait until all the images are converted to vectors. Load the vectors into Milvus, and you can get started with your image search:
Conclusion
This article demonstrates how to use Milvus and VGG to build a reverse image search system. Milvus is compatible with various deep learning platforms, and searches over billions of vectors take only milliseconds. Y
If you have any suggestions or comments, you can raise an issue on our GitHub repo or contact us on the Slack community.
- Milvus source code: https://github.com/milvus-io/milvus