
Face Landmark Estimation Application
After detecting a face in an image, as seen in the earlier post ‘Face Detection Application’, we will perform face landmark estimation. Face landmark estimation means identifying key points on a face, such as the tip of the nose and the center of the eye.
There are different estimation models based on the number of face landmark points. The 5 points model is the simplest one which only detects the edges of each eye and the bottom of the nose.

5 points face landmark model

Other models include 68 points face landmark model which detects 68 different points on the face including eyes, nose, lips and face shape.

68 points face landmark model

Face landmark estimation helps to build applications for applying digital makeup or widgets.
Build an Application for Estimating Facial Features
We will use face_recognition model build using ‘dlib’ library for our application. ‘dlib’ is principally a C++ library, however, we can use a number of its tools for python applications. face_recognition is a deep learning model with accuracy of 99.38%.
For more details and references, please visit:
face_recognition has built in functions to perform face detection, recognition and identification tasks. First, we will load the image into a NumPy array and apply face_landmarks function. face_landmarks function returns a list of all faces in the image. Each face is further having ‘name’ and ‘list of points’ for all facial feature of the face. Using the landmarks of each facial feature (eyes, nose, lips…etc.), we will draw red color lines around the facial features.
Note: The below code requires three Python external libraries pillow, face_recognition and dlib.
#import external libraries
import PIL.Image
import PIL.ImageDraw
import face_recognition

# Load the jpg file into a numpy array
image = face_recognition.load_image_file("people.jpg")

# Find all facial features in all the faces in the image
face_landmarks_list = face_recognition.face_landmarks(image)

number_of_faces = len(face_landmarks_list)
print("I found {} face(s) in this photograph.".format(number_of_faces))

# Load the image into a Python Image Library object so that we can draw on top of it and display it
pil_image = PIL.Image.fromarray(image)

# Create a PIL drawing object to be able to draw lines later
draw = PIL.ImageDraw.Draw(pil_image)

# Loop over each face
for face_landmarks in face_landmarks_list:

    # Loop over each facial feature (eye, nose, mouth, lips, etc)
    for name, list_of_points in face_landmarks.items():

        # Print the location of each facial feature in this image
        print("The {} in this face has the following points: {}".format(name, list_of_points))

        # Let's trace out each facial feature in the image with a line!
        draw.line(list_of_points, fill="red", width=2)

pil_image.show()
Below is the output of above code on different images.

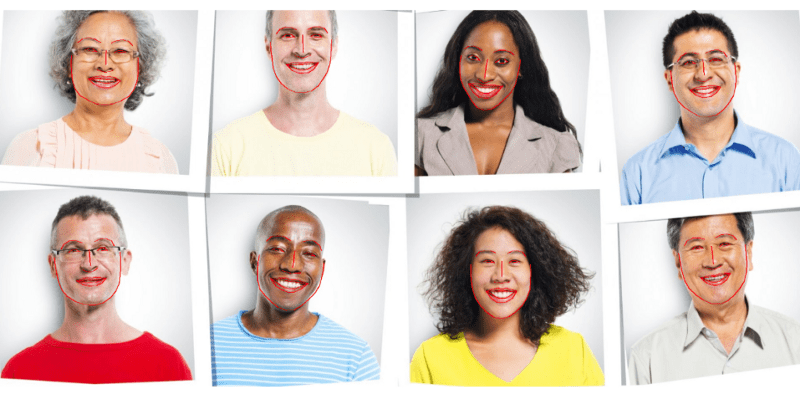
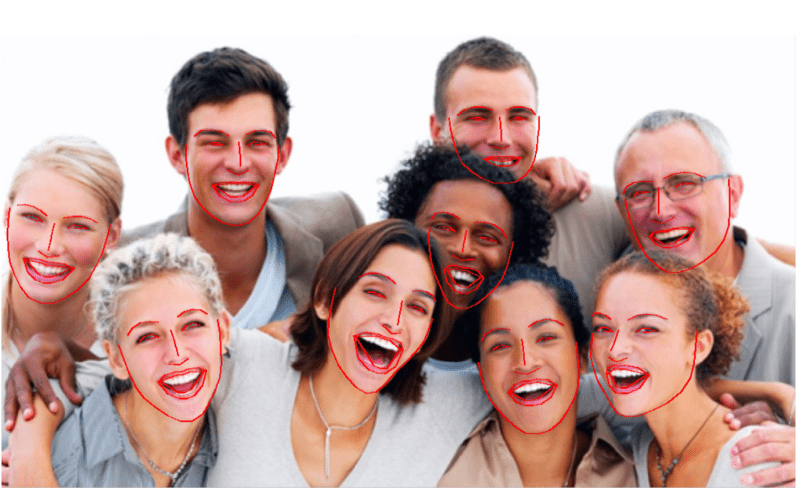
As you can see in the above images, the facial features are marked very precisely. We can further extend our application to apply digital makeup, widgets (glasses, masks…etc.) and so on. The author of the face_recognition and the reference to this article, Adam Geitgey, has provided many examples on his GitHub repository. I strongly recommend everyone to attend his course.
Also read: Face Landmark Estimation in a Live Video
Reference:
Deep Learning: Face Recognition by Adam Geitgey